IpTL’s DNS SecureSwitch™ Demo Setup
Least Privilege-Most Access Anti-Phone Home Demo
Setup your own Anti-Spying Demo with our Model 7111 and your Device
Setup your own Least-Privilege Anti-Phone-Home Demo. With your Model 7111 and our StepSwitch™ configuration file, you can quickly demonstrate device microsegmentation and isolation and keep your device from phoning home.
What you will need
- An IpTL Model 7111 appliance running firmware version 4.3.16 or later. Click here to request firmware.
- The StepSwitch™ Demo Configuration File. This file is loaded into the M7111. The Demo Config File Can be downloaded here.
- Any Ethernet device such as an IP camera, access panel, VoIP/Intercom, etc.
Load the Demo Config File
The first step is to load the demo config file into your appliance. Click here to download the demo pre-config file if you do not already have it.
Here are the steps to load a config file into your appliance.
- Log-in your appliance.
- Use the DHCP’d lease address issued to the appliance or set your networking on your laptop to 192.168.100.169/24.
- Access the appliance via http://192.168.100.170
- Username of admin
- Password of admin
- Use the DHCP’d lease address issued to the appliance or set your networking on your laptop to 192.168.100.169/24.
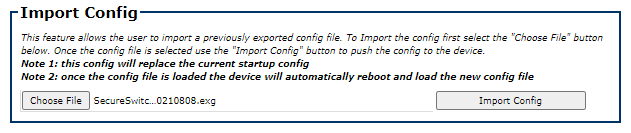
- On the appliance management web page navigate to Home->ImageMgmt and scroll down to the Import Config box.
- Select Choose File and select the .exg file to import (this is the one you downloaded previously)
- Select Choose File and select the .exg file to import (this is the one you downloaded previously)
- Click on the Import Config button. The system will import the configuration file and automatically reboot.
After reboot, the system will be fully configured for your demo.
Connections
Connecting your demo is straightforward.
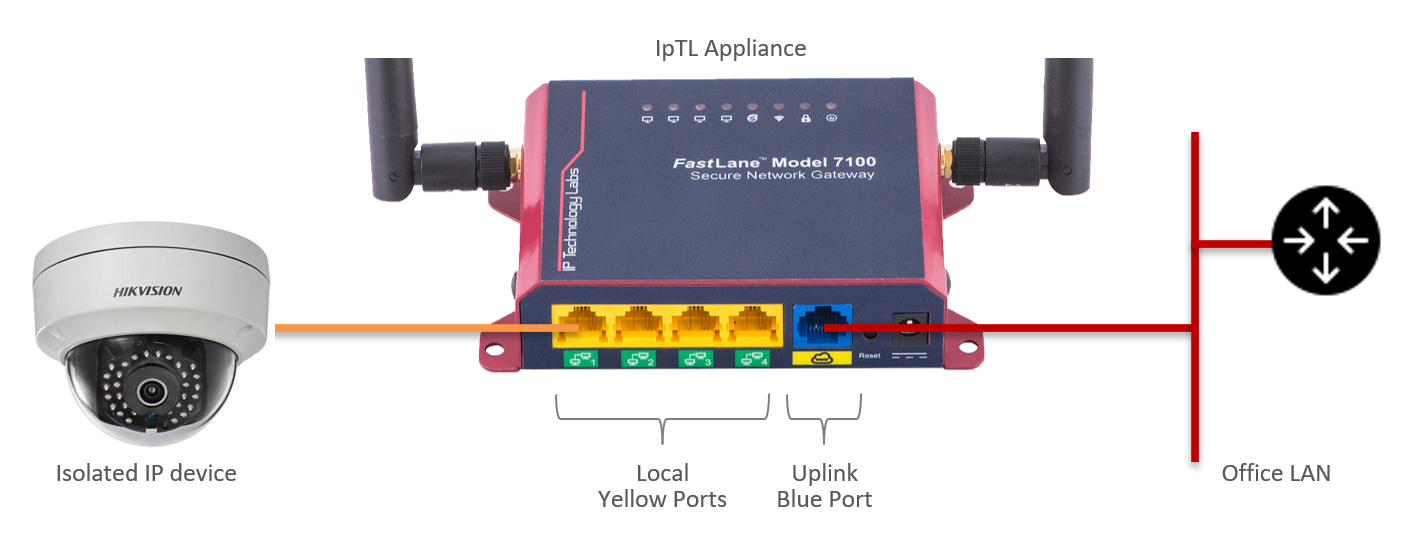
- Connect the device to be isolated to the yellow local port 1
- Connect the IpTL appliance to the LAN via the blue uplink port
Networking Configuration
The SecureSwitch™ demo has several pre-configured networking settings. These settings can be changed to accommodate your networking requirements.
The uplink (blue) port is set to DHCP client. When connected to your LAN it will request a DHCP address from your router. You can then use this address to access the device (see the section below on how to access.)
There is a secondary static IP of 192.168.100.170/24 on the main system interface. This is enabled to ensure connectivity to the appliance even if a DHCP server is unavailable. It may be desired in a production network to delete this interface or to put it into a VLAN for management so that it cannot be accessed from the yellow local ports. In a lab setup, you can connect your laptop to one of the yellow local ports and access the appliance using the secondary address of https://192.168.100.170:60443. Note that the DHCP server on the IpTL appliance is set to issue only one (1) IP Address. If your laptop grabs this address then your device will not receive an address. This can be modified in the DHCP server section on the appliance management web pages.
Note: Yellow local ports 2,3, and 4 are not disabled to enable local connection for testing and analysis. In a production installation, these ports would be disabled.
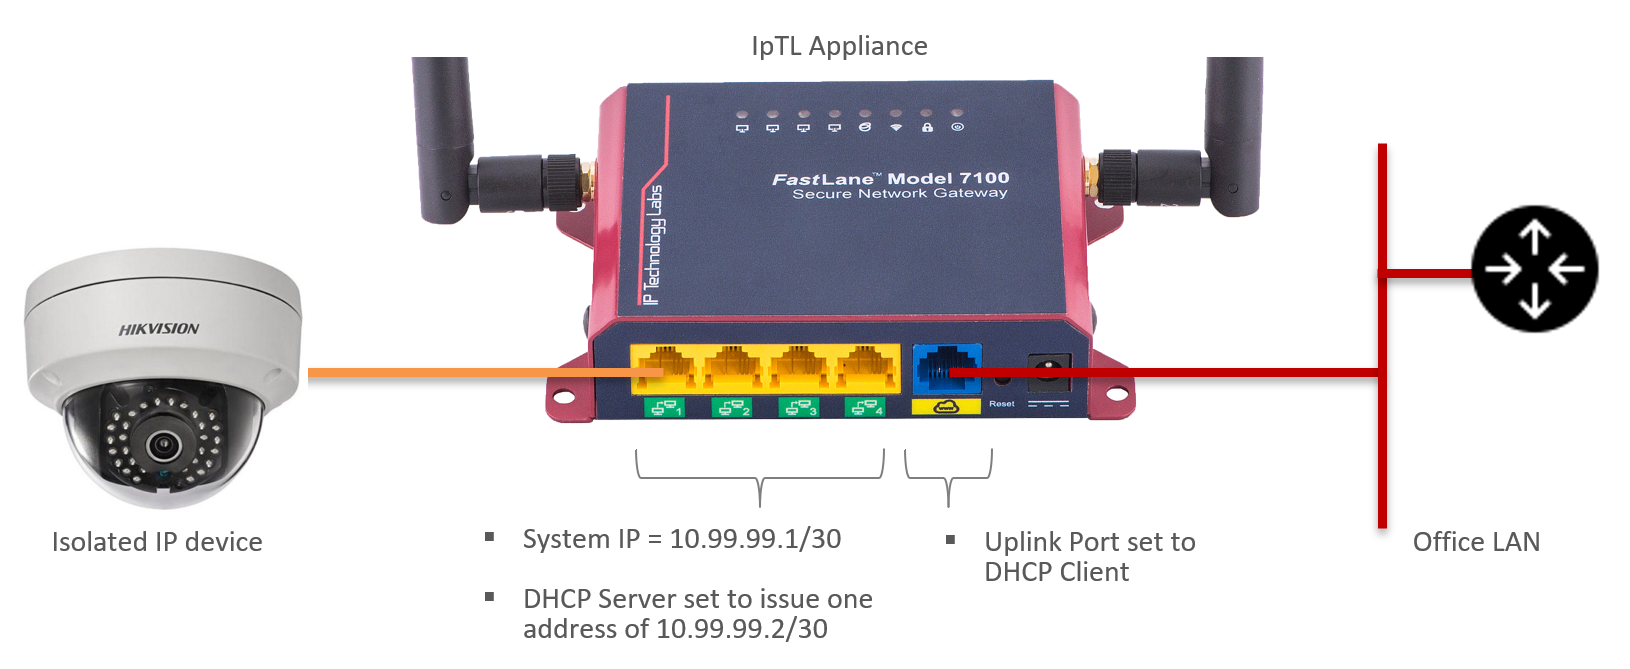
Use the following addressing if your isolated device doesn’t support DHCP or you wish to manually configure:
- IP address = 10.99.99.2/30 (mask=255.255.255.252)
- Default Gateway = 10.99.99.1
- DNS 8.8.8.8 and 9.9.9.9 (you can use your own DNS if you prefer)
Accessing the IpTL Appliance
The configuration of this demo allows the highest level of transparency from applications connecting to the isolated device. This includes all ports such as port 80, 443, RSTP, ONVIF. To accommodate this, we set the management webserver on the IpTL appliance to port 60443.
You can access your appliance three ways:
- Connect your laptop to one of the yellow local ports and open your browser to https://192.168.100.170:60443 (be sure to set an IP on your laptop to an address on the same network such as 192.168.100.169/24 (255.255.255.0)
- Connect from the LAN network to the DHCP address issued to the appliance by going to https://<DHCP address>:60443
- Note: You will need to check your router, login into the IpTL appliance locally, or connect via the IpTL SupportServer to learn the DHCP address.
- You also can statically configure an IP address for the uplink port as well.
- Connect from a SupportServer™ portal login. (contact us if you need help with this)
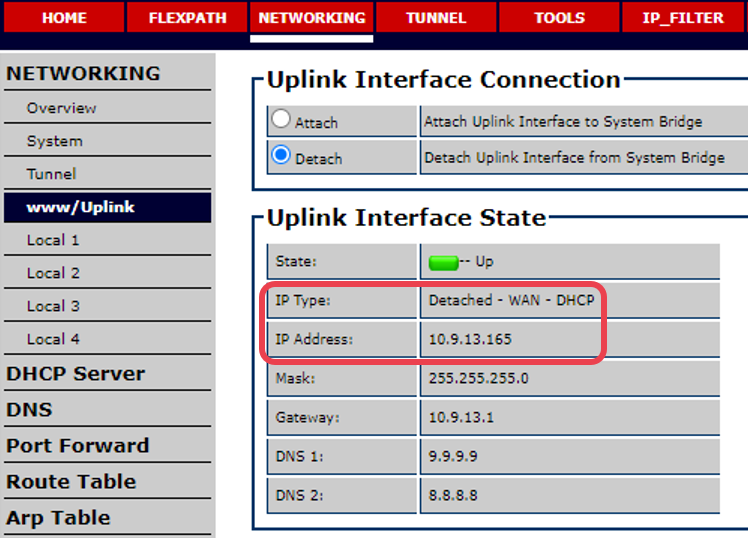
How to see the DHCP issued LAN address ?
To find the IP address that the IpTL appliance received during DHCP navigate to Networking>www/Uplink. The IP address is found under the Uplink Interface State. In this case, to access the appliance for management the browser URL would be https://10.9.13.165:60043.
SecureSwitch™ Setup
The SecureSwitch™ feature enables the isolation of network devices while still permitting desired access and operation from the LAN. Typically a firewall will be programmed with allow/block rules of IP addresses. This is fine if the address is always the same. But some services, such as NTP or cloud NVR services, don’t always have the same IP. SecureSwitch™ solves this problem by automatically updating IP filter ACL allow/block rules to only allow permissible DNS-based addresses to pass from the isolated side to the LAN side.
The SecureSwitch™ demo does the following:
- Allows the isolated device to perform DNS look-ups
- Only allows the device to communicate with *.ntp.org (for network time)
- All other device initiated network communications are blocked
- Any network requests from the LAN will be forwarded to the device and permitted to bi-directionally communicate. This ensures transparent compatibility with any vendor’s applications.
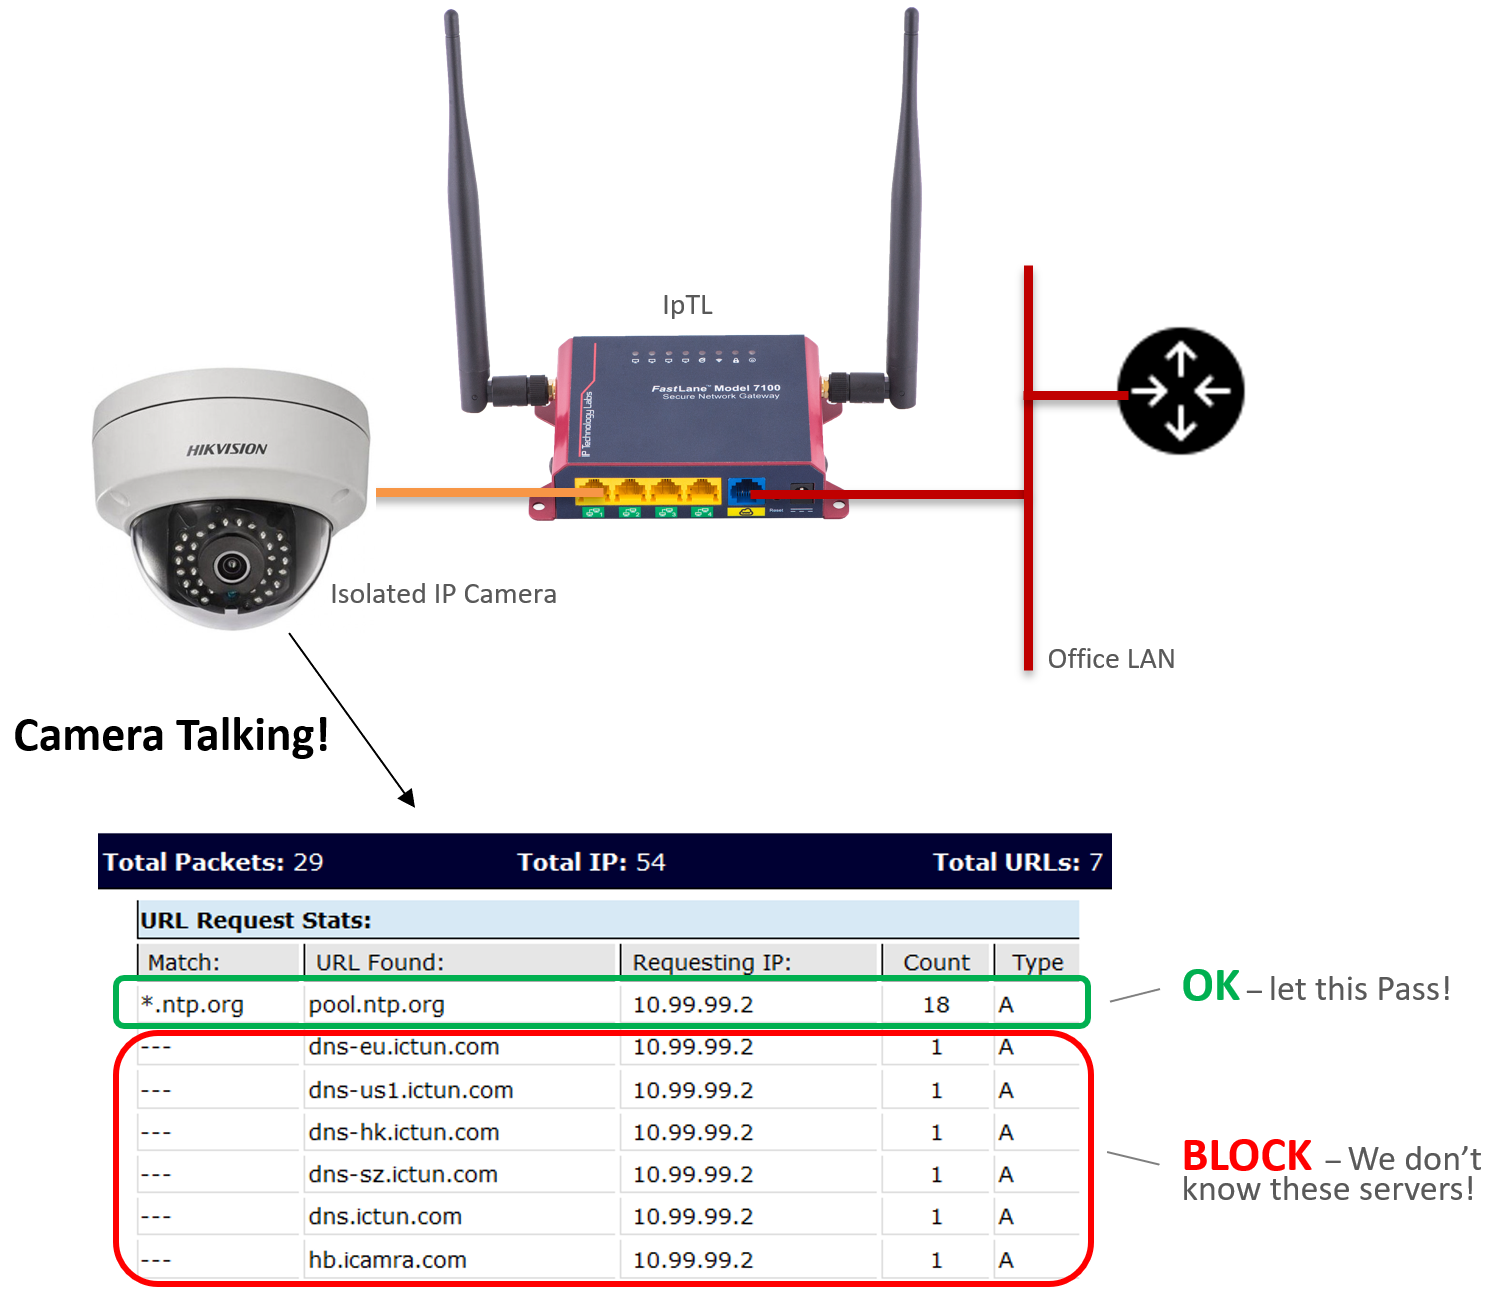
To see the SecureSwitch™ setup navigate to FlexPath->DNS SecureSwitch -> DNS Allow_NTP_only. Click on the right arrow next to > Show Stats to expand activity.
The following stats show the operation of an IP Camera configured for *.ntp.org as the time server. You’ll also notice eight other DNS addresses (most ending in ictun.com) that the IP camera is attempting to contact but we are blocking.
The filter rules in green are learned IP addresses from DNS resolution and are automatically updated into the IP Filtering/ACL allow/block rule sets. Depending on your device you’ll see different DNS/URL requests. You may also need to add your devices valid URL’s to the Add domains to match section if you don’t use ntp.org. In any event, you’ll see all the sites your device is trying to communicate with.
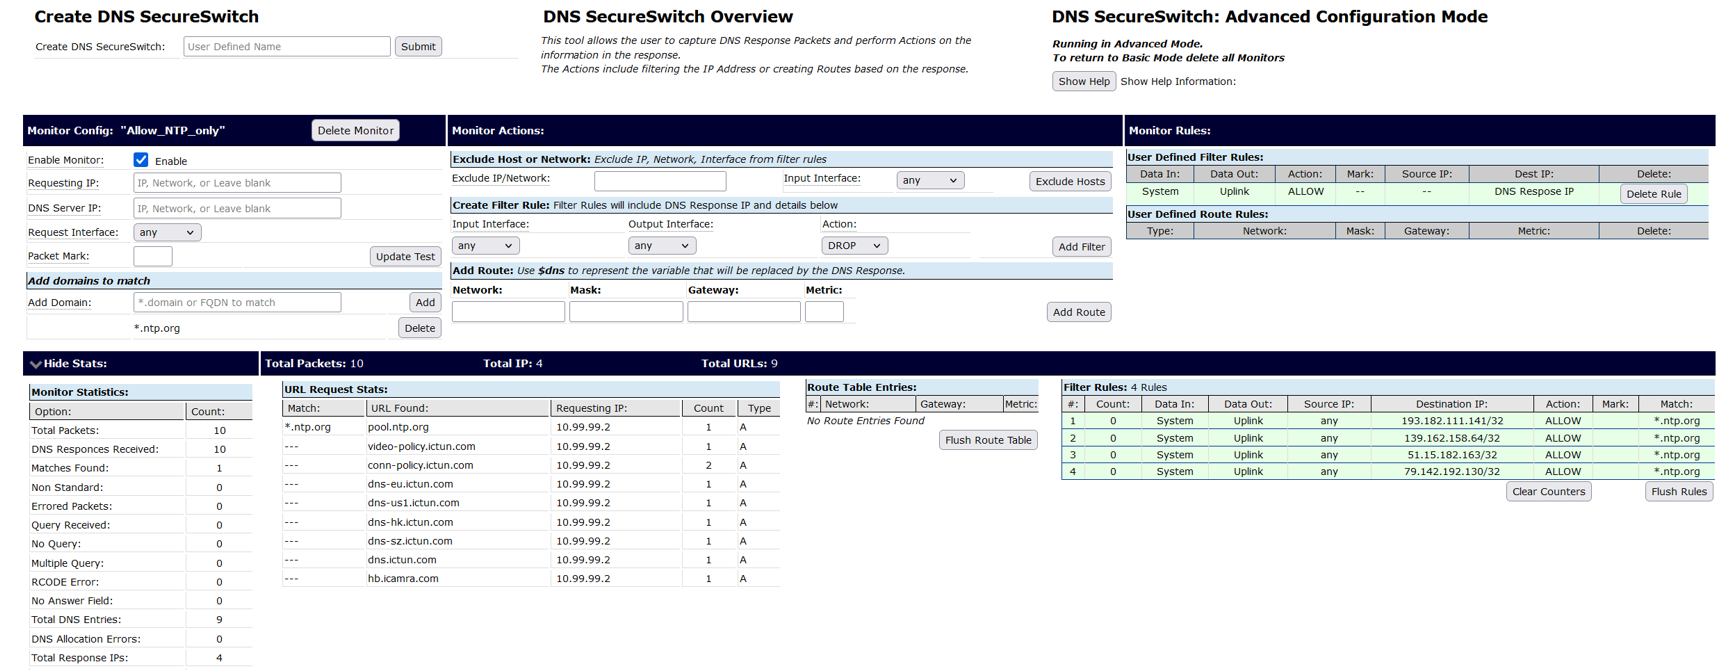
(click the picture to expand)
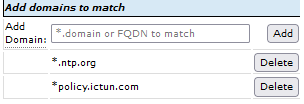
Making it Work for your Device
Depending on your device you may want to allow it to communicate with other DNS domains other than ntp.org. To add additional domains, or delete unused ones, navigate to the Flexpath>DNS SecureSwitch page. To allow a domain name that you want to permit the isolated device to communicate to, simply type in the domain in the Add Domain box and click the Add button. Note: Always be sure to click on Save Config so that your changes will be written to the boot-up configuration.
Note: You may use the * character to enable wild-card selection as well.
For example, we’ve added permission to allow the isolated device to communicate with any IP address associated with *policy.ictun.com domain blocking all other requests.
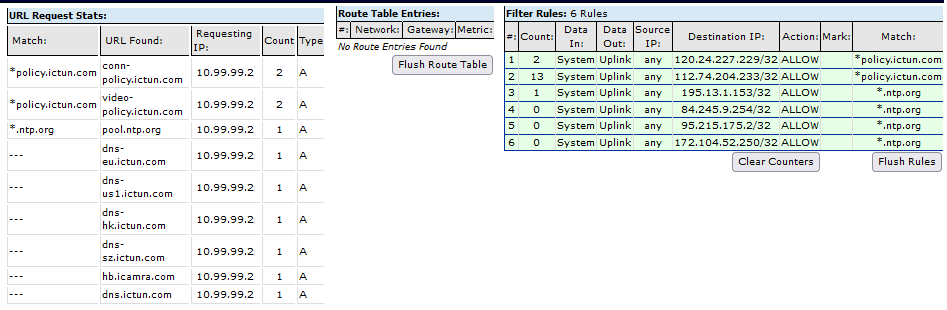
As shown below the green allows rules enable both *.ntp.org and *policy.ictun.com to communicate with the LAN/Internet. In this case *policy.ictun.com has returned two different addresses for the same service. Also notice that it does not allow the other ictun.com domains to pass.
Accessing your Isolated Device
If you want to access the isolated device’s management page, just open your browser normally. For example: An IP camera with it’s web server on port 80 you would simply open a browser to http://10.9.13.165. All ports, other than 60443, are sent towards the device. The firewall will open a matching return connection for the camera, for the duration of the LAN connection, enabling full and secure communication.
See the Magic for Yourself with our Free Trial Demo
Sometimes you just need to see it for yourself. We’ve setup a program to do just that. Click the Try Now if you want to see the magic of IpTL absolutely reliable networking!
All product names, logos, and brands are the property of their respective owners. All company, product, and service names used on and within this website are for identification/Fair-usee purposes only. Use of these names, logos, and brands does not imply endorsement nor conveys any evaluation about the product, service, or company.